User Guide
DeskFlow is a powerful desktop application built for IT helpdesk staff to streamline the management of contact information of employees, track device information, and keep track of service events. For the tech-savvy, DeskFlow is optimized for use via a Command Line Interface (CLI), while also featuring a well-designed, easy to use Graphical User Interface (GUI), making it easy to use for anyone.
- Quick start
-
Features
- Employee Information Stored by DeskFlow
- Command Format
- Viewing help :
help - Logging in :
login - Registering a new account :
register - Adding an employee :
add - Editing an employee’s details :
edit - Listing all employees :
list - Set an employee’s status :
set-status - Filter by status :
filter-status - Locating employee by name :
find - Locating employees by any attribute :
findby - Deleting an employee :
delete - Clearing all entries :
clear - Logging out :
logout - Exiting the program :
exit - Importing data :
import - Saving data
- Editing data file
- FAQ
- Known issues
- Command summary
Quick start
This quick start will walk you through installing DeskFlow and its dependencies, running the application, registering a new account and logging in. You will also learn how to use the DeskFlow UI and CLI, with some examples. If you’re an experienced user, you may wish to skip to the Features section.
Installation
.jar
file here,
or you may wish to build the project from source. Ensure
you have Java 17 installed.
Step 1. Install Java 17 or Above
Windows / Linux
Most Windows and Linux distributions come with Java pre-installed. To verify if you have a compatible version of Java,
open a Command Prompt on Windows, or a terminal
on Linux, and run the command java -version. You should see an output similar to either of the following:
java version "17.0.1" 2021-10-19 LTS
openjdk version "17.0.14" 2025-01-21
If you do not have Java installed, or if you have a version lower than 17 you may follow the installation
instructions for Windows here, and
Linux here.
Mac OS
You must follow the instructions here to install a specific version of the Java Development Kit (JDK).
To verify a successful installation, open a terminal and run the command java -version. You should see an output
similar to the following:
java version "17.0.14.fx-zulu" 2021-10-19 LTS
Step 2. Download DeskFlow
DeskFlow is available as a Java ARchive (JAR) file, terminating in .jar. Install the JAR file from our latest
release here.
Step 3. Creating a DeskFlow Home Folder
A home folder is the directory where the DeskFlow application’s .jar, as well as your data files, will be stored.
We recommend creating a new folder in your home directory called DeskFlow for this purpose. Copy the previously
downloaded DeskFlow.jar file into this folder.
Running DeskFlow
Ensure that you have followed steps 1-3 from the installation before proceeding.
- On Windows, open a command prompt, and on macOS/Linux, open a terminal. Run the command
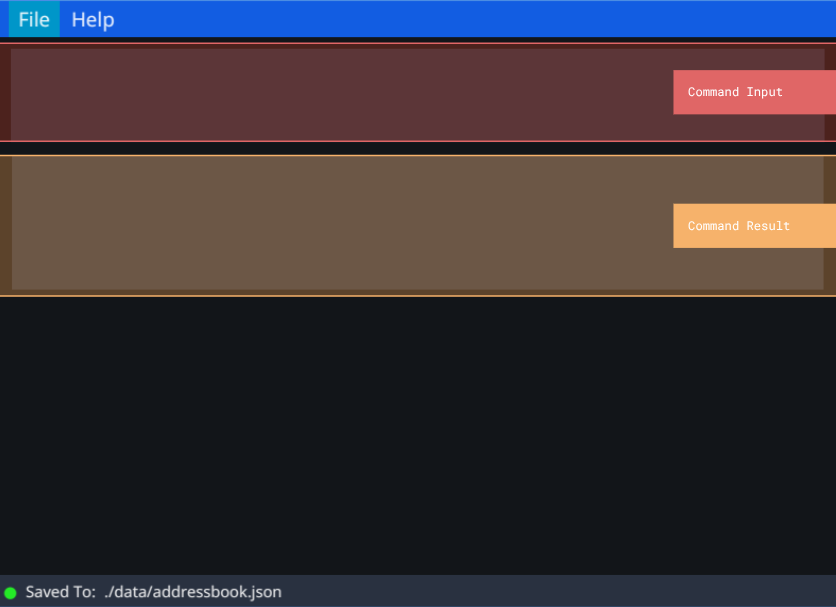
cd <path_to_home_folder>, substituting<path_to_home_folder>with the path to the folder you created in Step 3 of the installation. - Run the command
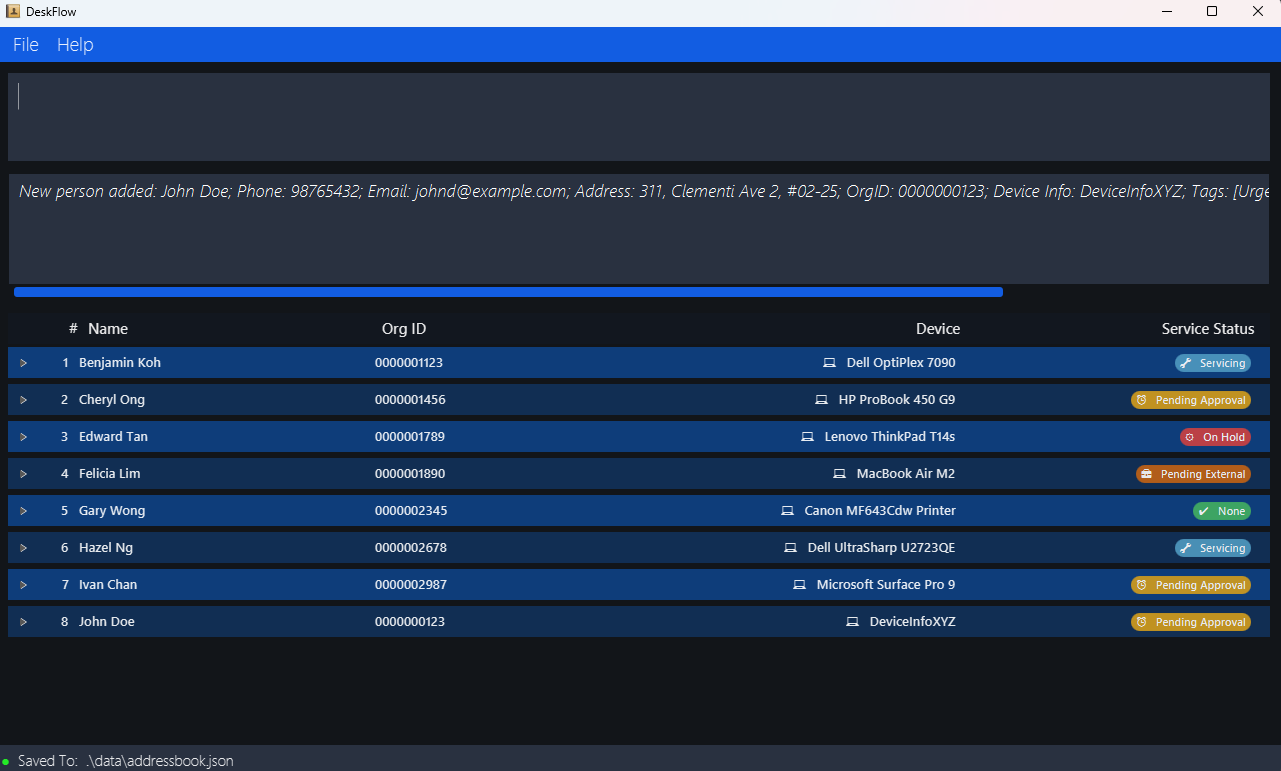
java -jar DeskFlow.jar. - A window similar to the following should appear. While you’ll learn more about the UI later in this guide, you should know about the command input box (highlighted in red), where you can enter commands to interact with DeskFlow. The command result box (highlighted in orange) will display the result of the command you entered.
Registering and Logging In
Since you’re using DeskFlow for the first time, you will need to register an account before you can log in.
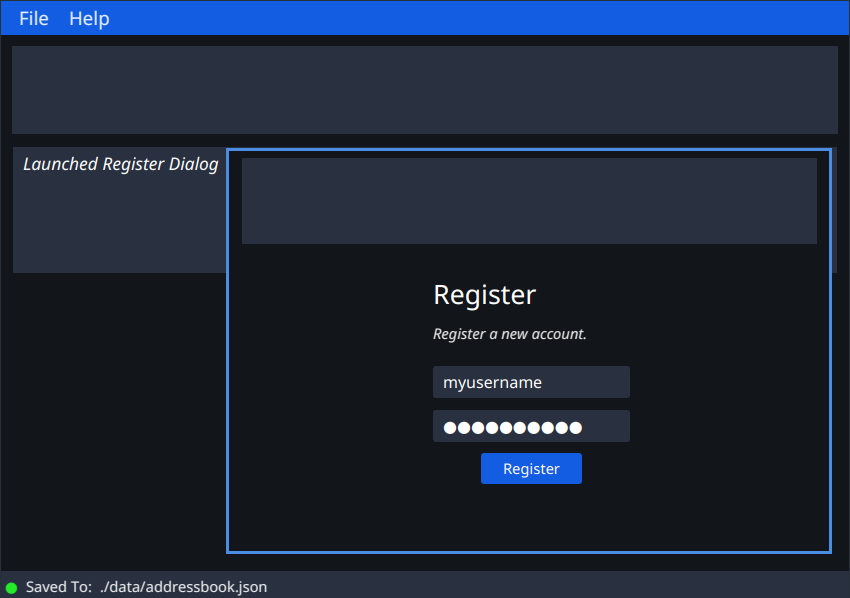
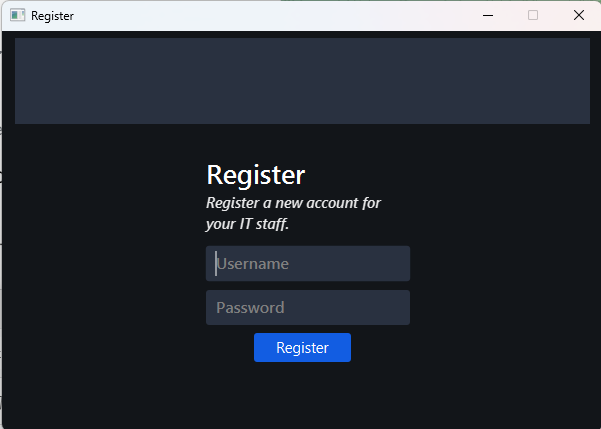
- Type the command
registerinto the command input box. A pop-up similar to the following should appear. Enter a suitable, non-empty username and password, and click theRegisterbutton. If successful, you should see a messageNew user added.in the command result box.
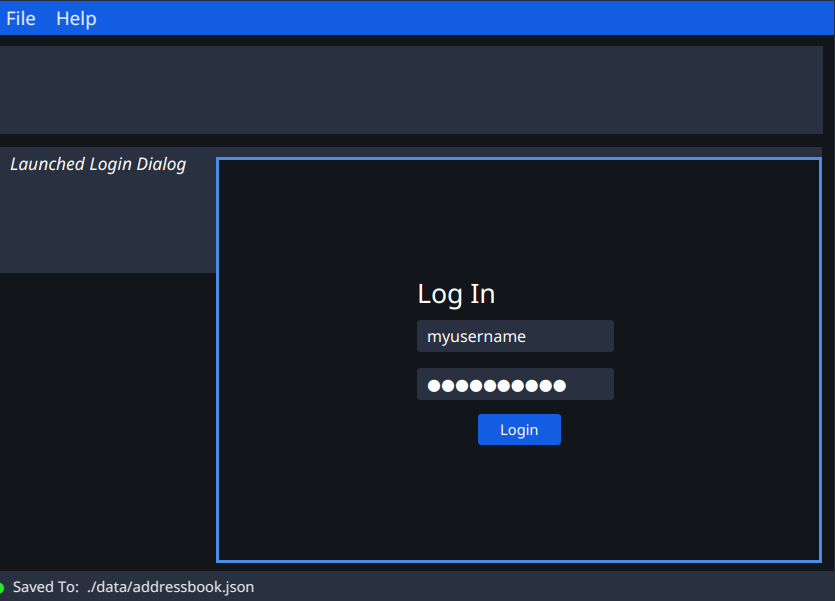
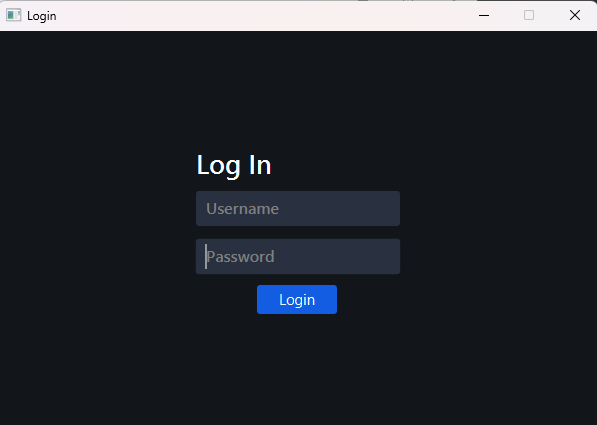
- In order to log in with this account, enter the command
logininto the command input box. A pop-up similar to the following should appear. Enter the username and password from the account you just created in the previous step, and click theLoginbutton.
Learning the DeskFlow UI
After logging in, you will be presented with the following DeskFlow UI. If you’re using DeskFlow for the first time in a newly created home folder, you will see some sample employees (dummy records) in the result table. Familiarize yourself with the various components of the DeskFlow UI.
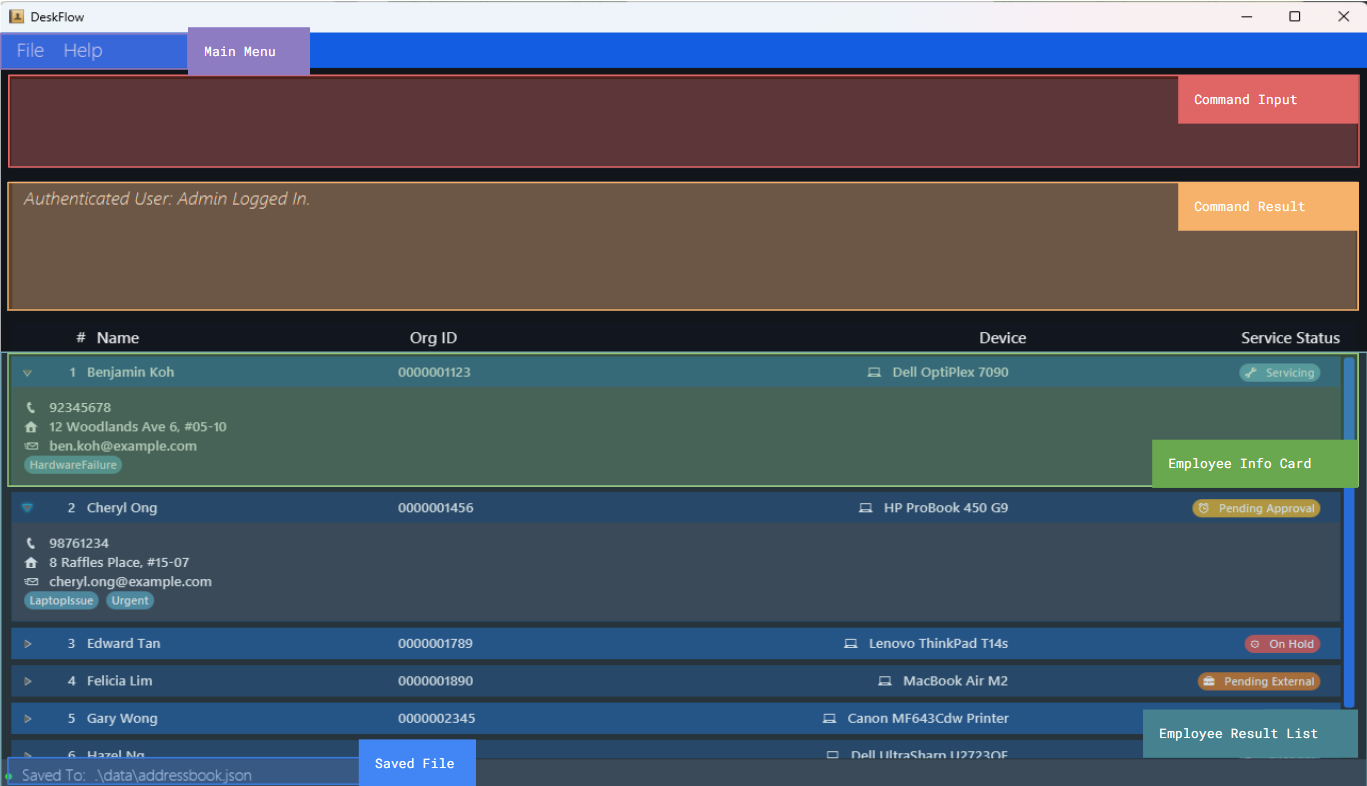
- Main Menu: Here, you can conveniently login, access help if you’re stuck, or change the file to which the address book is saved.
- Command Input: This is where you type commands to interact with the address book.
- Command Result: When you enter a command, its result will be displayed in this box.
- Result Table: When listing or viewing employees, they will be presented in a table here, whereby each column is associated with a field in the header.
- Person Card: A single employee is represented in a person card, which displays all of their relevant information. These cards are collapsed by default.
- Saved File: The file that this address book is saved to.
Learning the DeskFlow CLI
You’ve already used a few commands to register and log in. Now, let’s learn how to use the command line interface (CLI) to interact with DeskFlow.
Type the command in the command box and press Enter to execute it. e.g. typing help and pressing Enter will
open the help window. Here are some examples of commands you can try:
-
list: Lists all employees. -
add n/John Doe p/98765432 e/johnd@example.com a/311, Clementi Ave 2, #02-25 t/Urgent i/123 d/DeviceInfoXYZ
st/pending_approval
: Adds an employee namedJohn Doeto DeskFlow. -
delete 3: Deletes the 3rd employee shown in the current list. -
set-status 3 st/none: Sets the status of the 3rd employee tonone. -
filter-status st/none: Filter all employees that havenoneas a status. -
clear: Deletes all employees. -
logout: Logs out of account. -
exit: Exits the app.
Refer to the Features below for details of each command.
Features
This section will describe the features of DeskFlow, starting with the information stored by DeskFlow, and then instructions and examples for how to execute each command. Note that if you’re unfamiliar with the command format at any time, you may refer to the Command Format section for more details.
Employee Information Stored by DeskFlow
DeskFlow stores the following information for each employee, however, in order to help ensure that you enter valid information, each attribute has its own set of validation rules that must be adhered to when executing commands.
| Attribute | Validation Rules |
|---|---|
| Name | Only alphanumeric characters, /, ', -, and white spaces allowed. |
Must be in the format local-part@domain. Local-part: Alphanumeric characters and special characters +, _, ., - (not starting or ending with special characters). Domain: Labels separated by periods; each label must: start and end with alphanumerics, may contain hyphens, and last label ≥ 2 chars. |
|
| Phone Number | Digits only. Length must be > 3 and ≤ 20 digits. |
| Address | Any value allowed except those starting with prefixes like st/. Cannot be blank. |
| OrgID | Unique numeric value only. Must be ≤ 10 digits. Cannot be blank. |
| Device Info | Alphanumeric characters and spaces only. Cannot be blank. Must be ≤ 50 characters. |
| Tags | Alphanumeric characters only. No white spaces allowed (e.g., SoftwareIssue, HardwareIssue, not Software Issue). |
| Status | Must be one of the following: none, pending_approval, servicing, pending_external, on_hold. |
Command Format
![]() Tip: Reading the Command Format
Tip: Reading the Command Format
- Commands are case-sensitive and should all be in small letters.
- Words in
UPPER_CASEare the parameters to be supplied by the user.
e.g. inadd n/NAME,NAMEis a parameter which can be used asadd n/John Doe. - Words in square brackets are optional.
e.gn/NAME [t/TAG]can be used asn/John Doe t/Urgentor asn/John Doe. - Items with
…after them can be added multiple times including zero times.
e.g.[t/TAG]…can be used as ` ` (i.e. 0 times),t/InternetIssue,t/SoftwareIssue t/Urgentetc. - Parameters can be in any order.
e.g. if the command specifiesn/NAME p/PHONE_NUMBER,p/PHONE_NUMBER n/NAMEis also acceptable. - Extraneous parameters for commands that do not take in parameters (such as
help,list,exit,login,logoutandclear) will be ignored.
e.g. if the command specifieshelp 123, it will be interpreted ashelp. - If you are using a PDF version of this document, be careful when copying and pasting commands that span multiple lines as space characters surrounding line-breaks may be omitted when copied over to the application.
Viewing help : help
Shows you a message explaining how to access the help page.
Format: help
Logging in : login
Opens a Login Dialog where you are prompted to enter your username and password to log in to gain access to DeskFlow Features.
Format: login
![]() Additional Information
Additional Information
- DeskFlow will not grant access to other features until you are logged in.
- DeskFlow is a CLI first application where keyboard inputs are optimised, as such you may hit the
Enterto log in, after filling in the username and password. - For first time DeskFlow users, you must
registeran account before logging in.
Registering a new account : register
Adds credentials for the new DeskFlow user.
Format: register
![]() Additional Information
Additional Information
- You must not have previously registered an account.
- You can only register a single account once, after which you will not be able to register again.
- At this time, once you have registered an account, you cannot change your username or password.
Adding an employee : add
Adds an employee to DeskFlow.
Format: add n/NAME p/PHONE_NUMBER e/EMAIL a/ADDRESS [t/TAG]… i/ORGID d/DEVICEINFO st/STATUS
Examples:
add n/John Doe p/98765432 e/johnd@example.com a/311, Clementi Ave 2, #02-25 t/Urgent t/SoftwareIssue i/123 d/DeviceInfoXYZ st/pending_approvaladd n/Betsy Crowe t/NetworkIssue e/betsycrowe@example.com a/Newgate Prison p/98752135 i/122 d/DeviceInfoABC st/none
![]() Additional Information
Additional Information
- Each employee must have a unique organisation ID.
- All attributes are mandatory to be filled in except for tags.
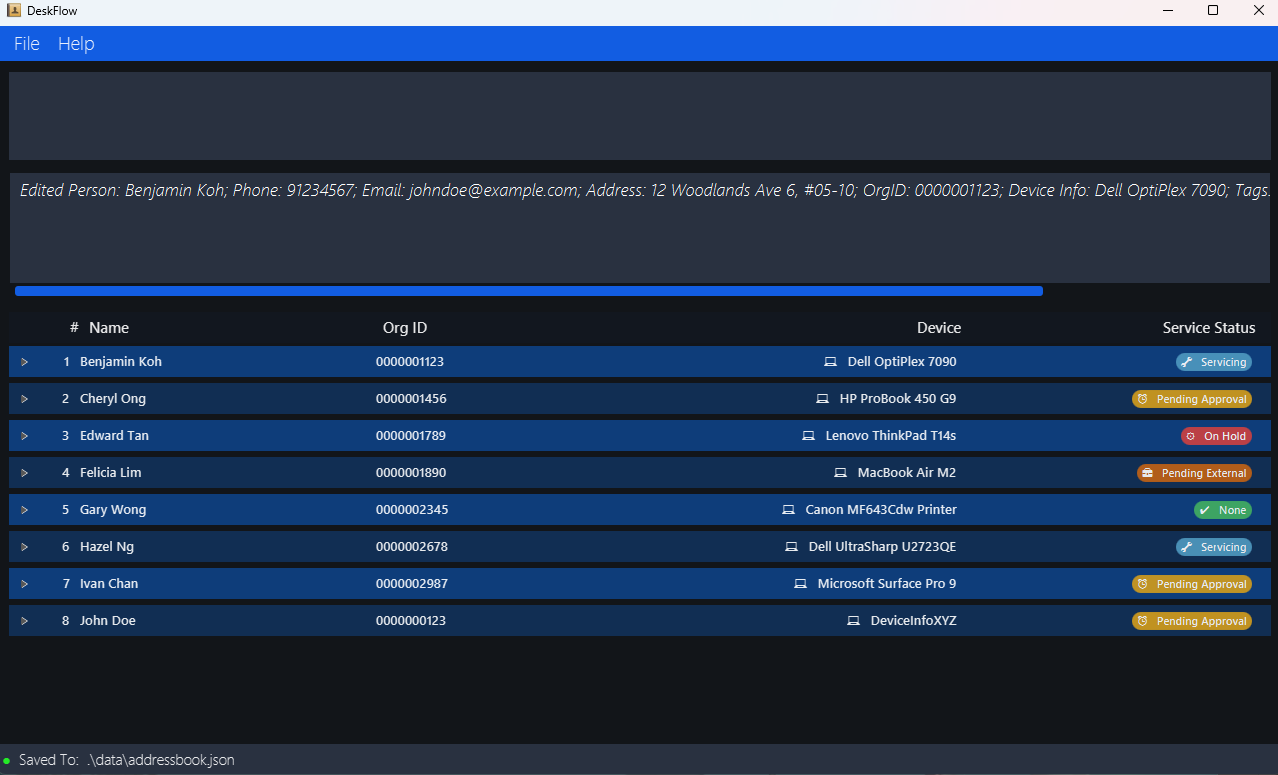
Editing an employee’s details : edit
Edits an existing employee’s details in the address book.
Format: edit INDEX [n/NAME] [p/PHONE] [e/EMAIL] [a/ADDRESS] [t/TAG]… [i/ORGID] [d/DEVICEINFO] [st/STATUS]
Examples:
-
edit 1 p/91234567 e/johndoe@example.comedits the phone number and email address of the 1st person to be91234567andjohndoe@example.comrespectively. -
edit 2 n/Betsy Crower t/edits the name of the 2nd person to beBetsy Crowerand clears all existing tags.
![]() Additional Information
Additional Information
- Edits the person at the specified INDEX. The index refers to the index number shown in the displayed person list. The index must be a positive integer 1, 2, 3, …
- At least one of the optional fields must be provided.
- Existing values will be updated to the input values.
- When editing tags, the existing tags of the person will be removed i.e adding of tags is not cumulative.
- You can remove all the person’s tags by typing t/ without specifying any tags after it.
Listing all employees : list
Shows a list of all employees in the organization recorded in DeskFlow.
Format: list
Set an employee’s status : set-status
Sets an existing employee’s current status to the provided status.
Format: set-status INDEX st/STATUS
Examples:
-
set-status 1 st/pending_approvalsets the status for the 1st person in the list shown currently listed topending_approval.
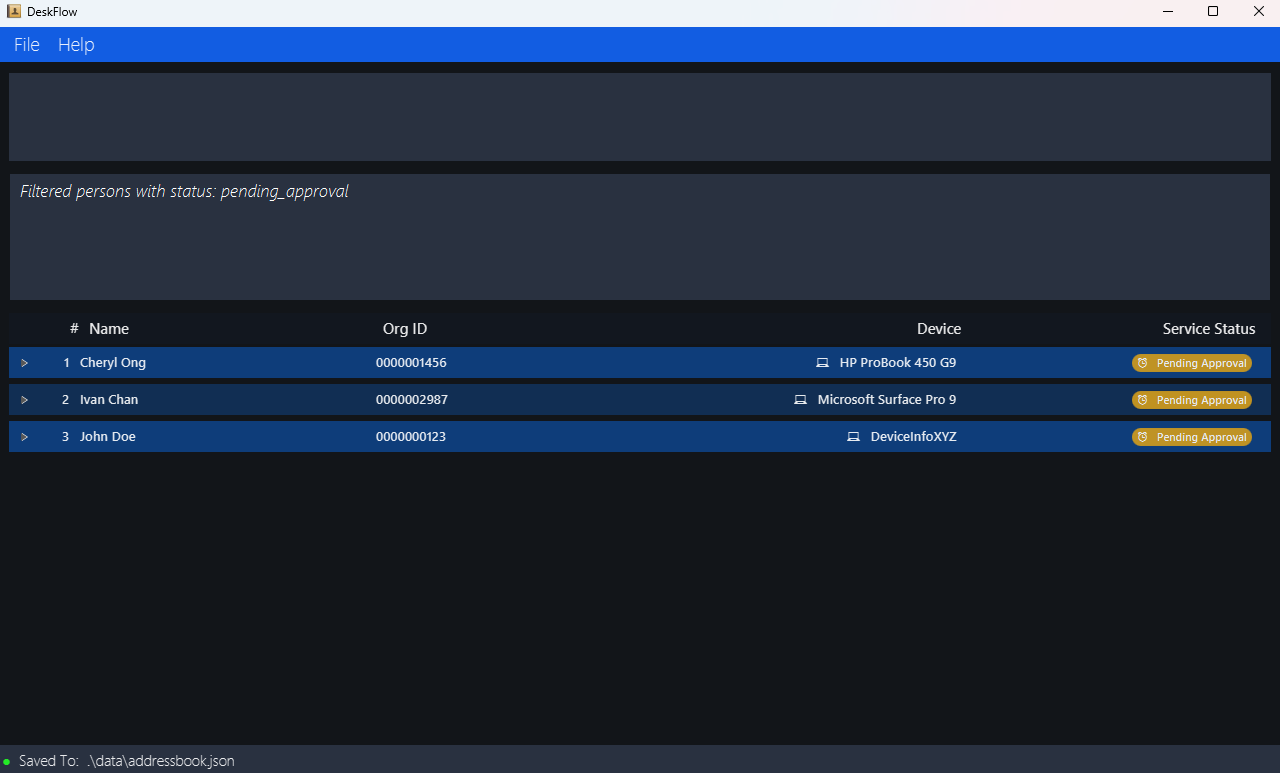
Filter by status : filter-status
Format: filter-status st/STATUS
Examples:
-
filter-status st/pending_approvalgets all employees with status ofpending_approval.
Locating employee by name : find
Finds employees whose names contain any of the given keywords.
Format: find KEYWORD [MORE_KEYWORDS]
Examples:
-
find Johnlists employees with name containingjohnlikeJohn Doe -
find alex davidlists employees with name containingalexanddavidlikeAlex Yeoh,David Li
![]() Additional Information
Additional Information
-
findis case-insensitive. (i.e.hanswill matchHans) - The order of the keywords does not matter. (i.e.
Hans Bowill matchBo Hans) - Only full words will be matched. (i.e.
Hanwill not matchHans) - Employees whose names matching at least one keyword will be listed.
e.g.
Hans Bowill listHans Gruber,Bo Yang
Locating employees by any attribute : findby
Finds employees for which any of the specified attributes contains the specified keyword / search term.
Format: findby [n/NAME_KEYWORD] [p/PHONE_KEYWORD] [e/EMAIL_KEYWORD] [a/ADDRESS_KEYWORD]
[t/TAG_KEYWORD]… [i/ORGID_KEYWORD]
[d/DEVICEINFO_KEYWORD]
[st/STATUS_KEYWORD]
Examples:
-
findby n/alex st/pending_externallists all employees that either contain namealexor the statuspending_external. -
findby a/jurong st/pending_approvallists all employees with an address containingjurongor the statuspending_approval.
![]() Additional Information
Additional Information
- The order of specifying attributes does not matter, so the query
findby n/jon st/nonewill be equivalent tofindby st/none n/jon. - If multiple attributes are given, employees that contain the keyword in any of the corresponding attribute will be listed.
- For each attribute, the search is case-insensitive, and the entire keyword / search term will be partially matched
inside the attribute. So, for example, searching
findby a/ blk123will show an employee with the addressBlk123. - For each attribute, the keyword / search term will be partially matched inside the attribute, and can contain
spaces. For example, searching
findby n/ alex yeohwill show an employee with the nameAlex Yeoh Tan Wei. - In a single attribute all keywords will be considered as one. (i.e.
H nwill not matchHansorHan).
Deleting an employee : delete
Deletes the specified person from the address book.
Format: delete INDEX
![]() Additional Information
Additional Information
- Deletes the person at the specified
INDEX. - The index refers to the index number shown in the displayed person list.
- The index must be a positive integer 1, 2, 3, ….
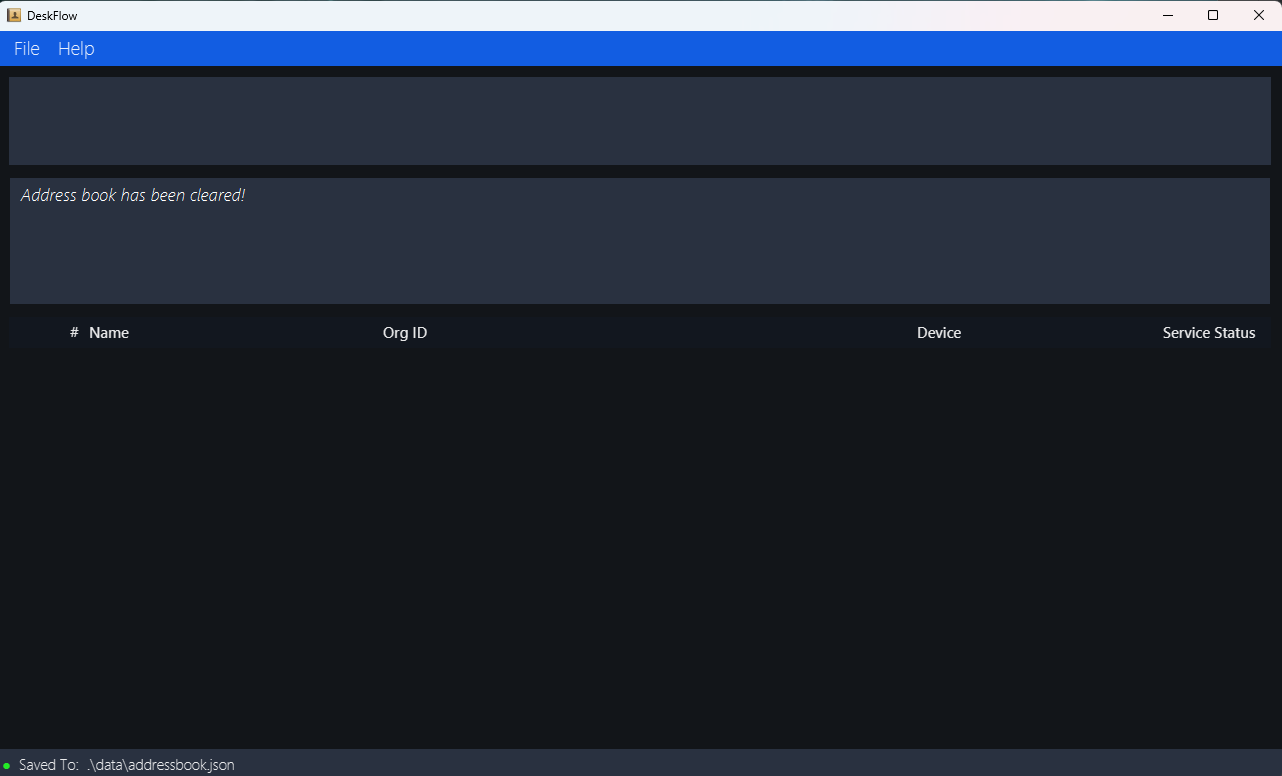
Clearing all entries : clear
Clears all entries from the address book.
Format: clear
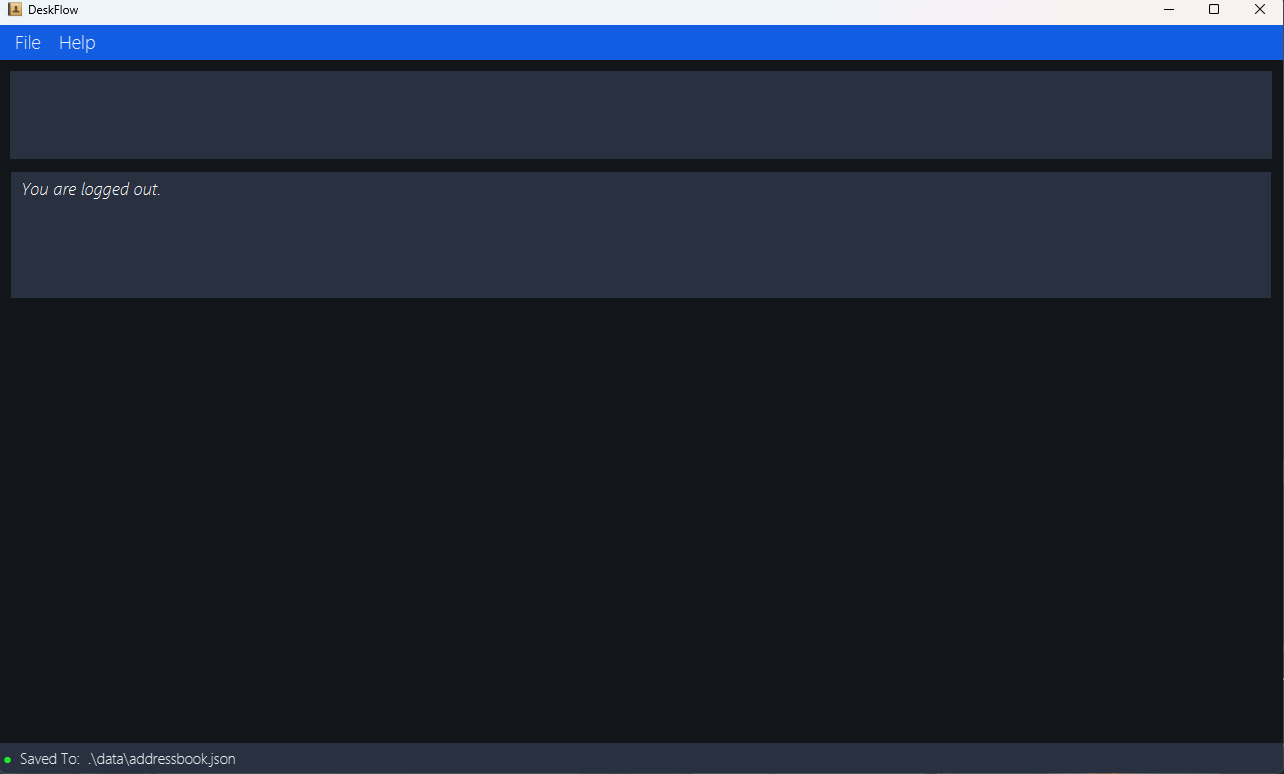
Logging out : logout
Logs the user out.
Format: logout
Exiting the program : exit
Exits the program.
Format: exit
Importing data : import
AddressBook data can be imported from an existing AddressBook JSON file.
Format: import PATH
Example:
-
import data\import.jsonreplaces existing data with the imported JSON.

- You should see a success message after successfully importing.

![]() Additional Information
Additional Information
- You can use either relative (
data/imported_AB.json) or absolute path (C:\Users\keega\Documents\tp\data\import.json). - You should use the pathing convention that matches your Operating System for better results.
- The import function is meant to replace the existing AddressBook data and not for exporting to a new JSON file.
Saving data
Your DeskFlow data is saved in the hard disk automatically after any command that changes the data. There is no need for you to save manually. You can see where the data is stored at the bottom of the DeskFlow window.
Editing data file
Your DeskFlow data is saved automatically as a JSON file [JAR file location]/data/addressbook.json. Advanced users are
welcome to update data directly by editing that data file.
Furthermore, certain edits can cause DeskFlow to behave in unexpected ways (e.g., if a value entered is outside the acceptable range). Therefore, edit the data file only if you are confident that you can update it correctly.
FAQ
Q: How do I transfer my data to another computer?
A:
You should install DeskFlow on the other computer and overwrite the empty JSON data file with the JSON file of your
previous DeskFlow application.
You can find your previous JSON file in the home folder.
Q: Is there a way to undo an accidental employee deletion?
A:
Unfortunately you cannot undo an accidental employee deletion, but it is possible to add the employee back again.
Q: Who has access to employee data?
A:
Only users that are logged in can access and read the employee data.
Known issues
-
When using multiple screens, if you move the application to a secondary screen, and later switch to using only
the primary screen, the GUI will open off-screen. The remedy is to delete the
preferences.jsonfile created by the application before running the application again. -
If you minimize any of the Pop-Up Help/Login/Register Windows and then run the
help/login/registercommand (or use the corresponding menu buttons or keyboard shortcuts) again, the original Window will remain minimized, and no new window will appear. The remedy is to manually restore the minimized window in your operating system. - You might not see icons rendering correctly depending on your Operating System or the fonts you have installed. We are working on allowing icons to be universally visible.
Command summary
| Action | Format, Examples |
|---|---|
| Add |
add n/NAME p/PHONE_NUMBER e/EMAIL a/ADDRESS i/ORGID d/DEVICEINFO st/STATUS [t/TAG]… e.g., add n/John Doe p/98765432 e/johnd@example.com a/311, Clementi Ave 2, #02-25 i/000123 d/DeviceInfoXYZ st/pending_approval t/Urgent t/SoftwareIssue
|
| Delete |
delete INDEXe.g., delete 3
|
| Edit |
edit INDEX [n/NAME] [p/PHONE_NUMBER] [e/EMAIL] [a/ADDRESS] [t/TAG]… [i/ORGID] [d/DEVICEINFO] [st/STATUS]e.g., edit 2 n/James Lee e/jameslee@example.com
|
| Find |
find KEYWORD [MORE_KEYWORDS]e.g., find James Jake
|
| Find By |
findby [n/NAME_KEYWORD] [p/PHONE_KEYWORD] [e/EMAIL_KEYWORD] [a/ADDRESS_KEYWORD] [t/TAG_KEYWORD]… [i/ORGID_KEYWORD] [d/DEVICEINFO_KEYWORD] [st/STATUS_KEYWORD] e.g., findby n/James Jake st/none
|
| Set Status |
set-status INDEX st/STATUS e.g., set-status 1 st/none
|
| Filter Status |
filter-status st/STATUS e.g., filter-status st/none
|
| Import |
import PATH e.g., import data/imported_AB.json
|
| List | list |
| Help | help |
| Login | login |
| Logout | logout |
| Register | register |
| Clear | clear |